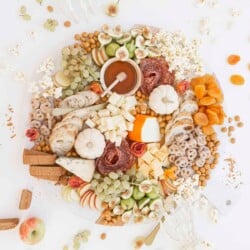
Equipment
- Large board or platter
Ingredients
- honey
- mini pumpkins
- cheddar cheese Unexpected Cheddar
- gouda cheese 1,000 Day Gouda
- port salut cheese
- blue cheese Cave Aged Blue Cheese
- salami calabrese
- baguette
- figs
- apples
- grapes
- dried apricots
- small pretzels
- popcorn
- pumpkin biscotti
Instructions
- Prep your ingredients – Slice your fruits, cheeses, etc. so you are ready to plate. Also assemble your salami rose per the instructions in the blog post.
- Place board – Place board wherever it is you’ll be serving it. It’s much easier this way!
- Create the layout – You’ll want to layout your bowl and pumpkins first as they can take up the most room and create a good focal point. Fill the bowl with honey.
- Place the heroes – In this case the cheese and salami roses. Try to layer around placed items if possible.
- Place larger items/supporting ingredients – For this board this is the bread, then pretzels, biscotti. Add some to both sides of the board. Again, build around the pieces already on the board.
- Fruit – Add in the different fruits, build around what’s there and try to set them up in a couple spots.
- Fillers – I always use a few things as fillers. For this board our fillers are popcorn and espresso beans. Stick these in the empty spots. For a board like this…more is always more. Just keep going!
- Utensils – Stick in small spoons, forks, cheese knives, etc. where needed.
- Decorate – If you like a bit of extra flair like I do, you can always add edible flowers, skeleton hands, some faux spiders, etc. to fill in any last holes. Or you can add things like luster dust or prism powder for more glitz.
Notes
- Feel free to swap out ingredients for things you enjoy most.
- Wash your pumpkins in the sink like you would with other produce.
- Add fun Halloween decor for flair!
Tried this recipe?Mention @amanda.wilens