Black Velvet Cake
This Black Velvet Cake is the perfect treat for Halloween. It’s got a spooky look, while also being super cute and super delicious. A fun treat for the whole family or a party. If you are looking for a smaller batch version you can try these Black Velvet Cupcakes.
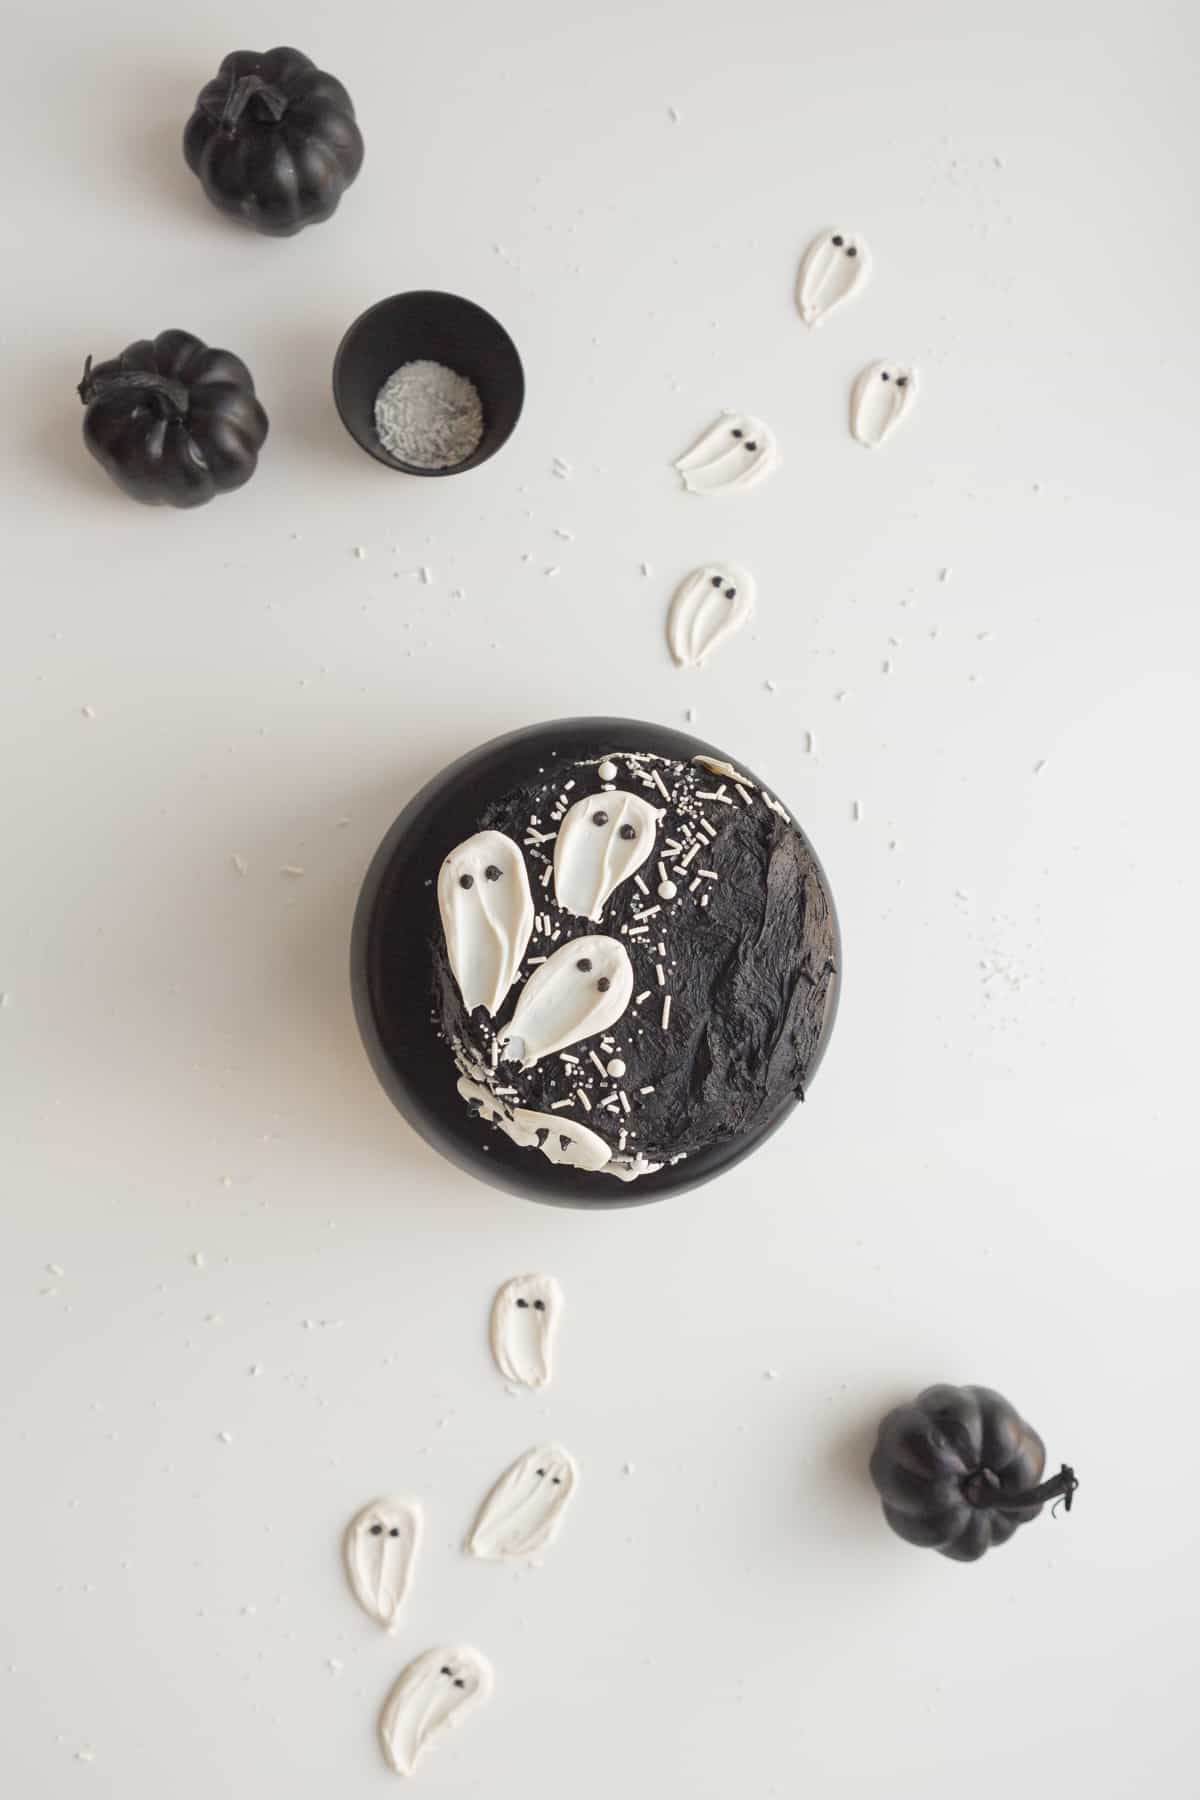
Table of contents
Why This Recipe is Great
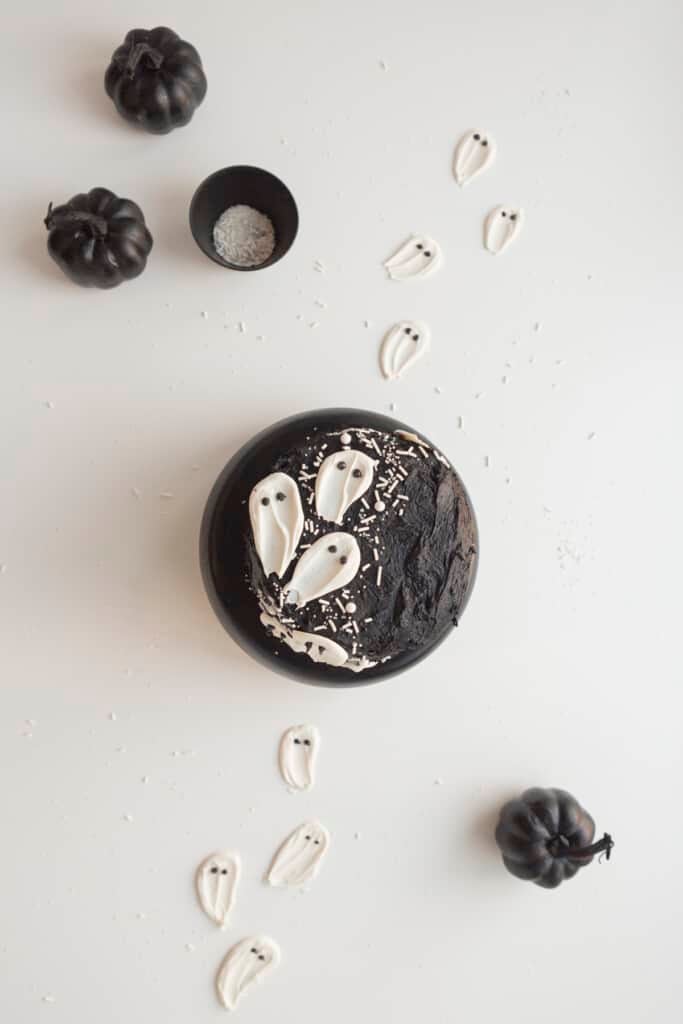
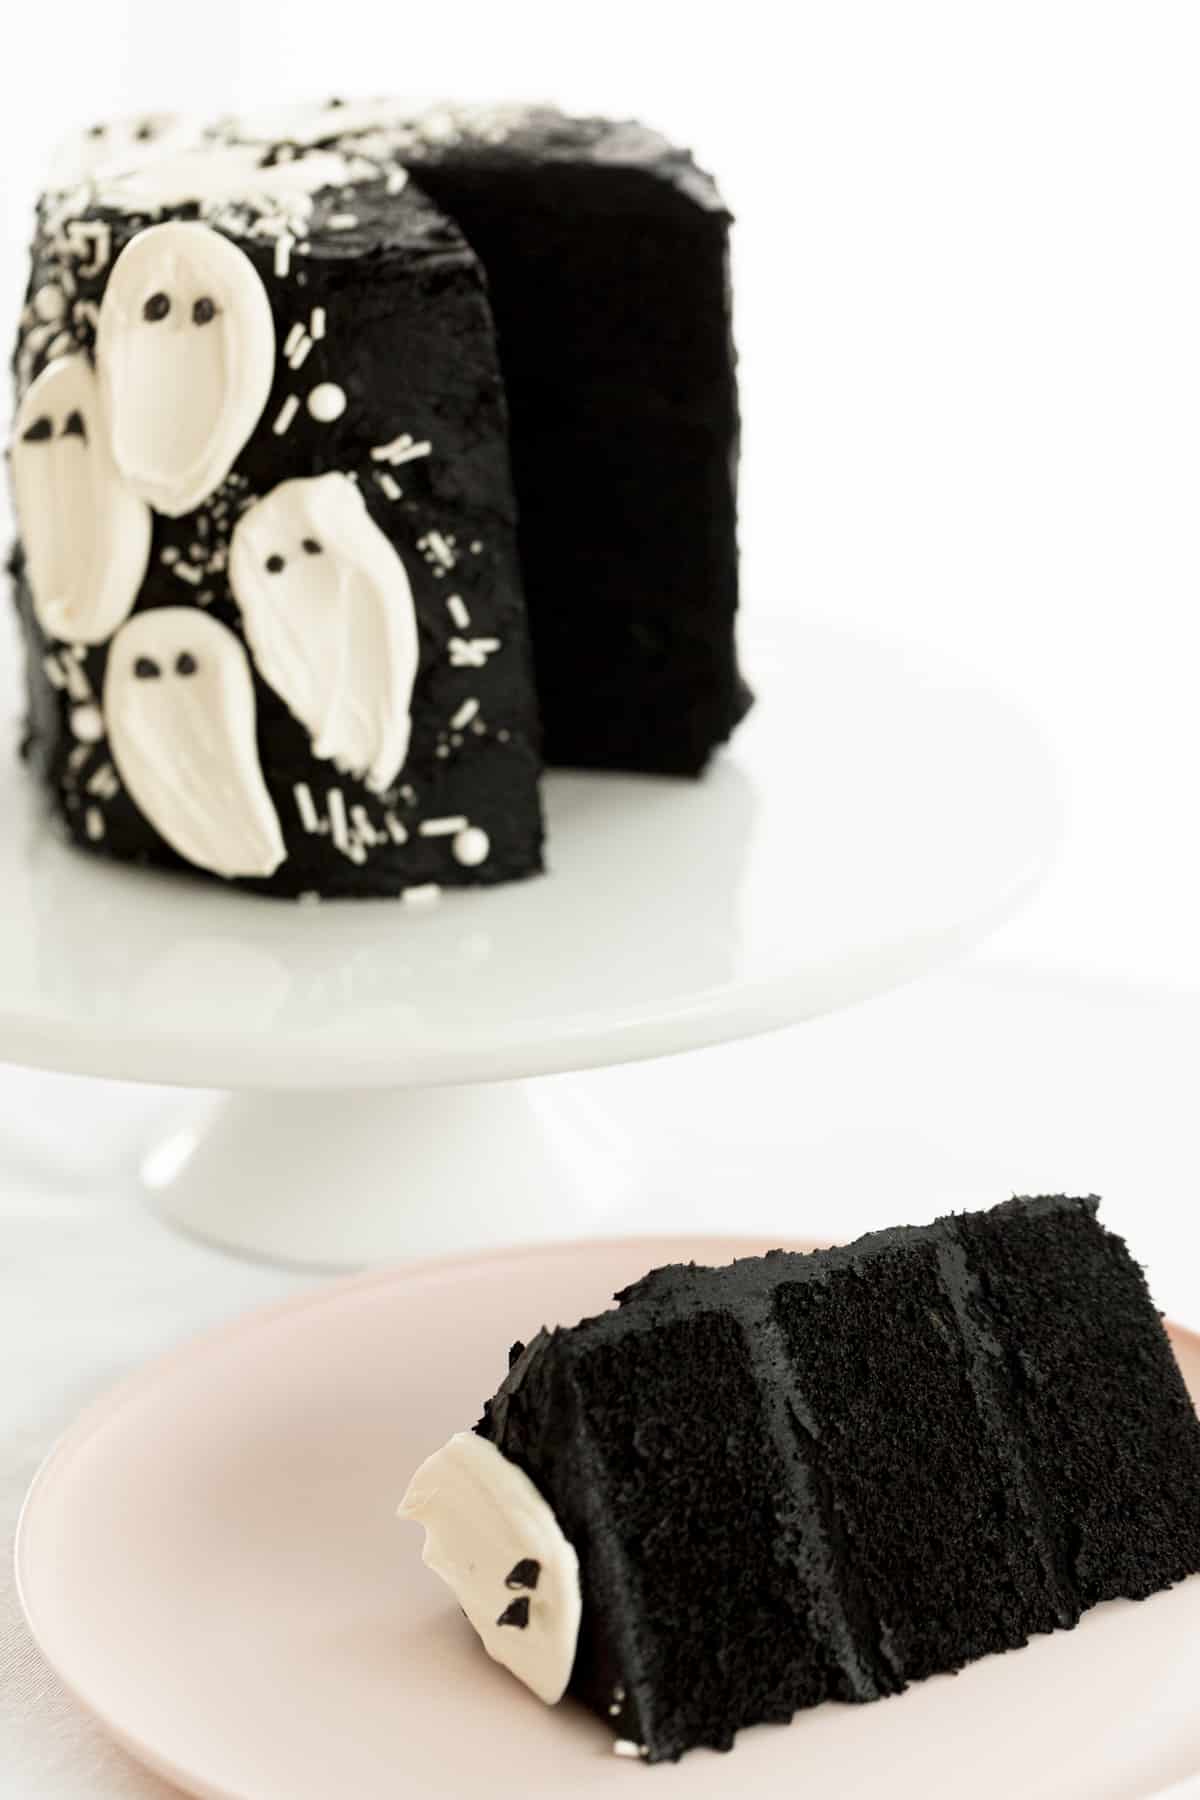
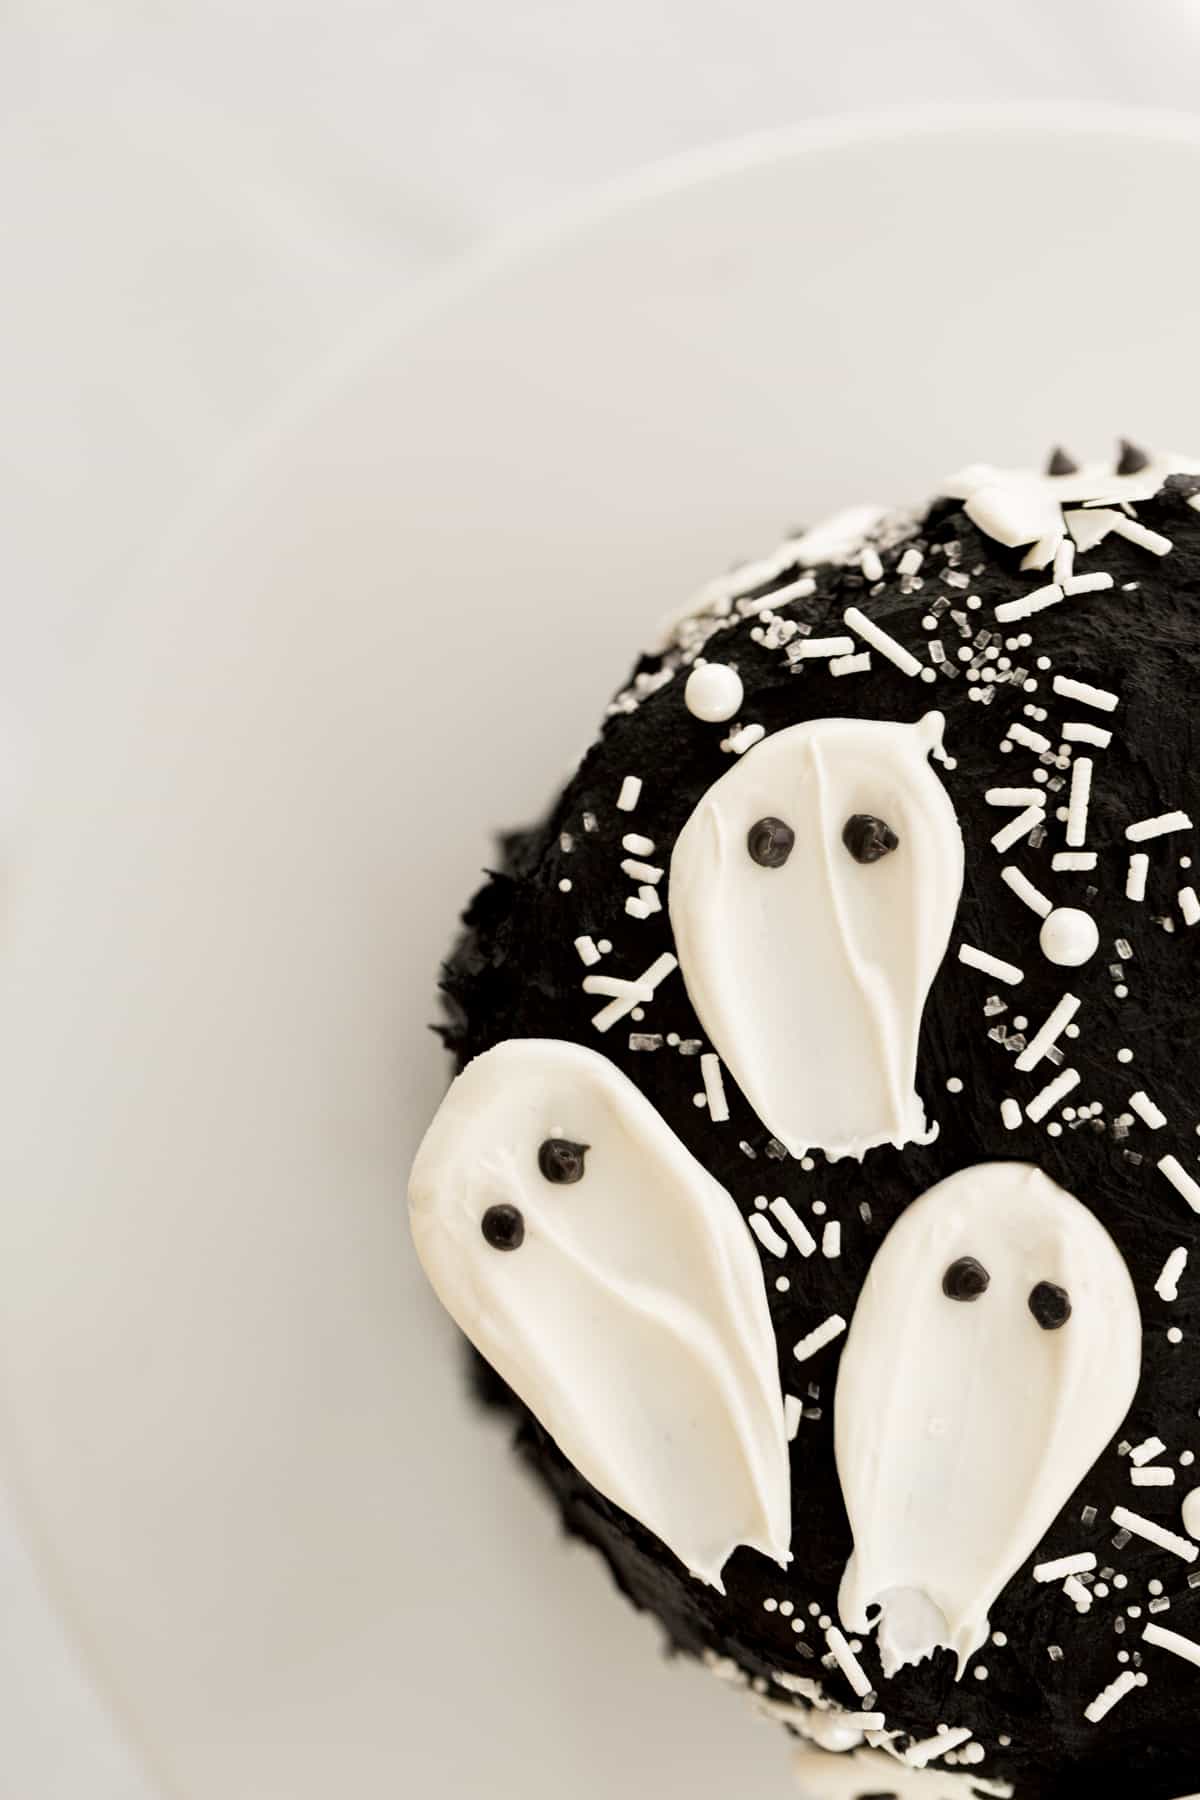
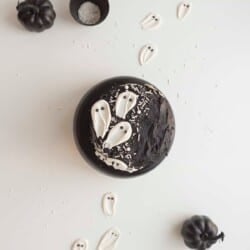
This recipe is chocolaty and tastes like a delicious red velvet cake. BUT it’s a deep black color, which is wonderful for Halloween or a specific themed party. This one though has these sweet little ghosts that just make it perfect for a spooky Halloween gathering.
It’s a fairly simple recipe to make. You don’t have to be an expert baker for this cake…it also hides a LOT of mistakes because of the black frosting…errors are okay! Making it three layers isn’t necessary. You could do two 8 inch or 9 inch round cake pans for a different sized layer cake or even a sheet pan. You’ll just need to adjust the bake time and assembly steps.
Ingredients
I always suggest using exactly what a recipe calls for, especially when baking. Baking is a science and switching out ingredients can cause big issues in the recipe. If you’re looking for gluten-free, dairy-free, etc. it would be best to find a different blog with that type of recipe.
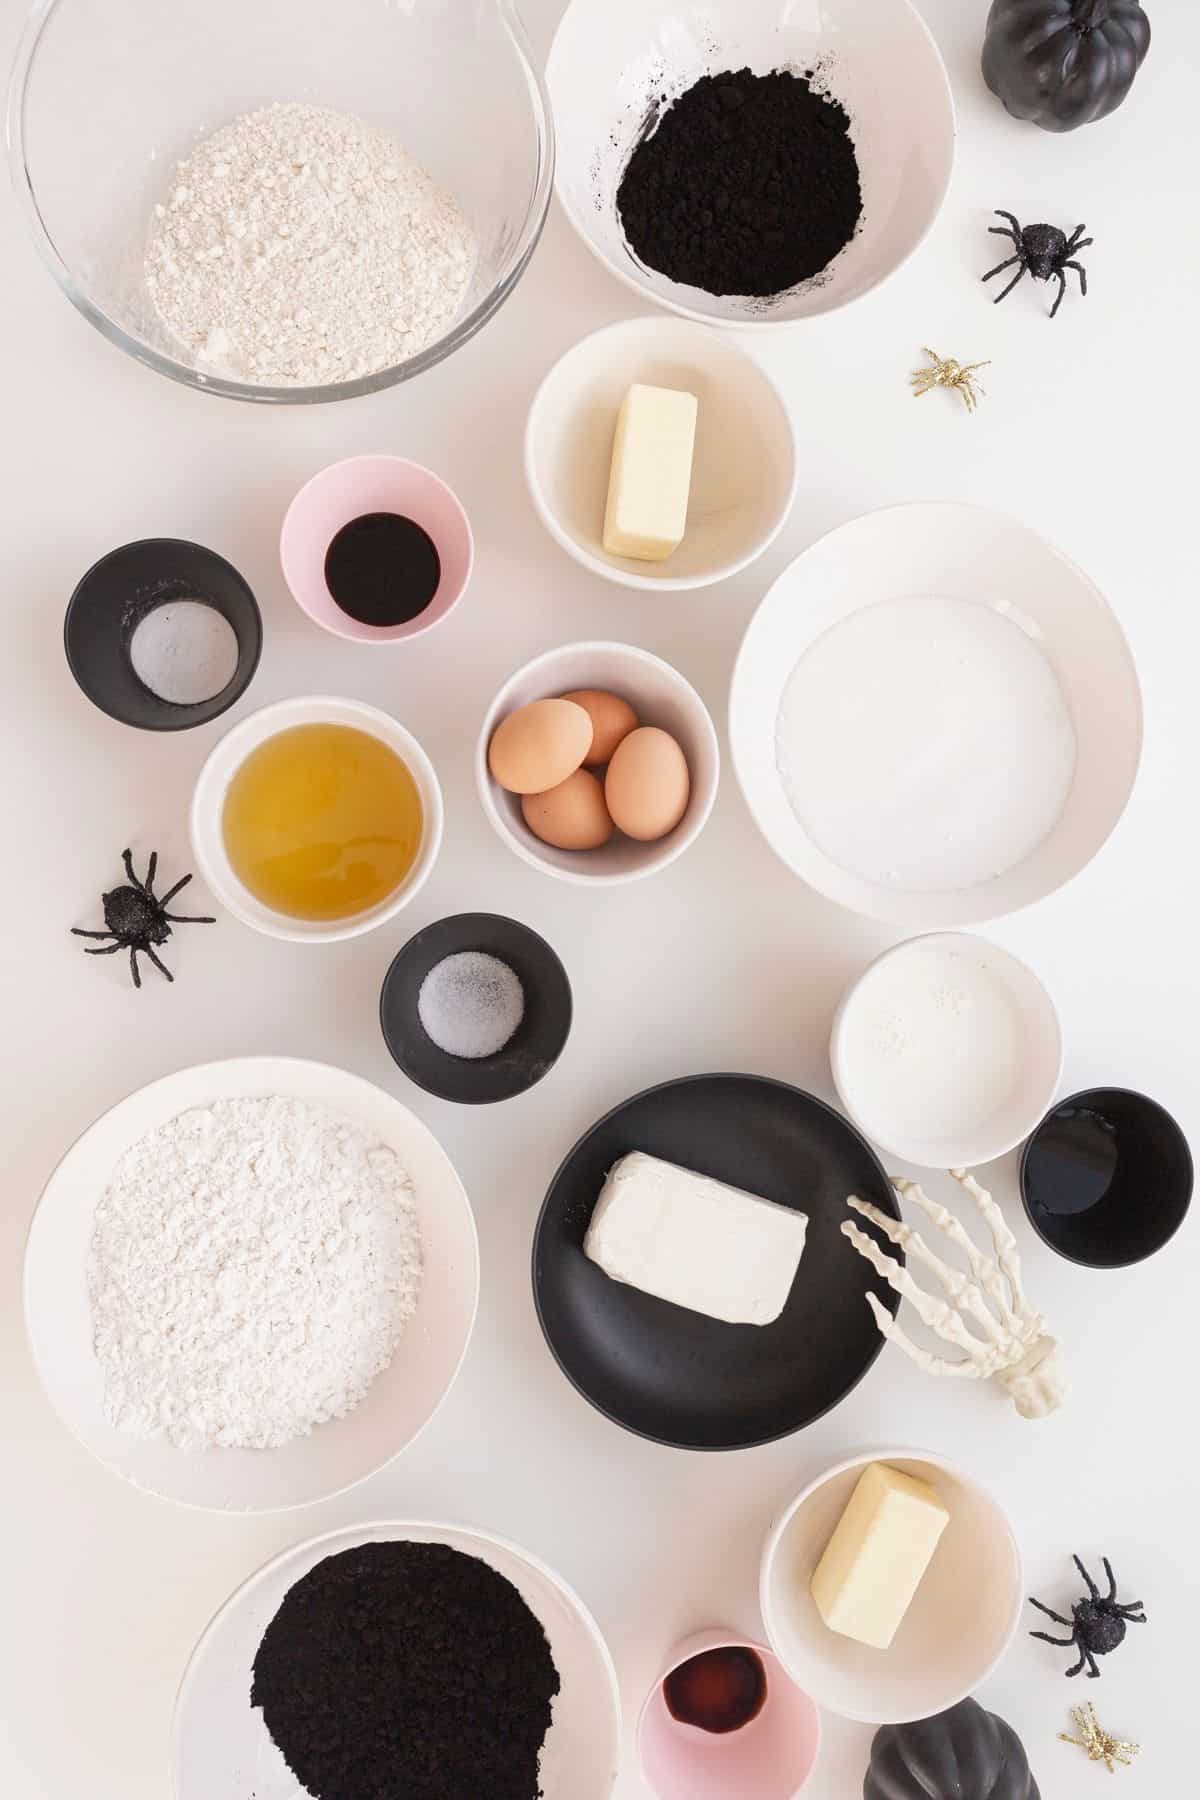
- Unsalted butter: Always use unsalted butter in baking. This allows you to control the amount of salt added into the desserts. You also need your butter to come to room temperature.
- Grapeseed Oil: You can replace this with another neutral oil that works well for baking. Other options are vegetable or canola oil. You can use something like olive oil or sunflower oil, but they usually have more of a flavor to them.
- Milk or Buttermilk: You can make your own butter milk by letting the milk sit with vinegar in it for a few minutes. I usually use this option since I won’t use up the whole container of buttermilk. But you can just purchase buttermilk and use that in place of the milk and vinegar.
- Black Cocoa Powder: This is fairly easy to find online. However, if you prefer to use just normal cocoa powder you can add a bit of black food dye instead. Just add it slowly as it can alter the taste of the cake. Also, avoid using charcoal. This can be dangerous for those on medications.
- Sprinkles: You can use whatever floats your boat. I love using these cute white ones that go well with the ghosts, but anything Halloween would be great.
How to Make the Cake
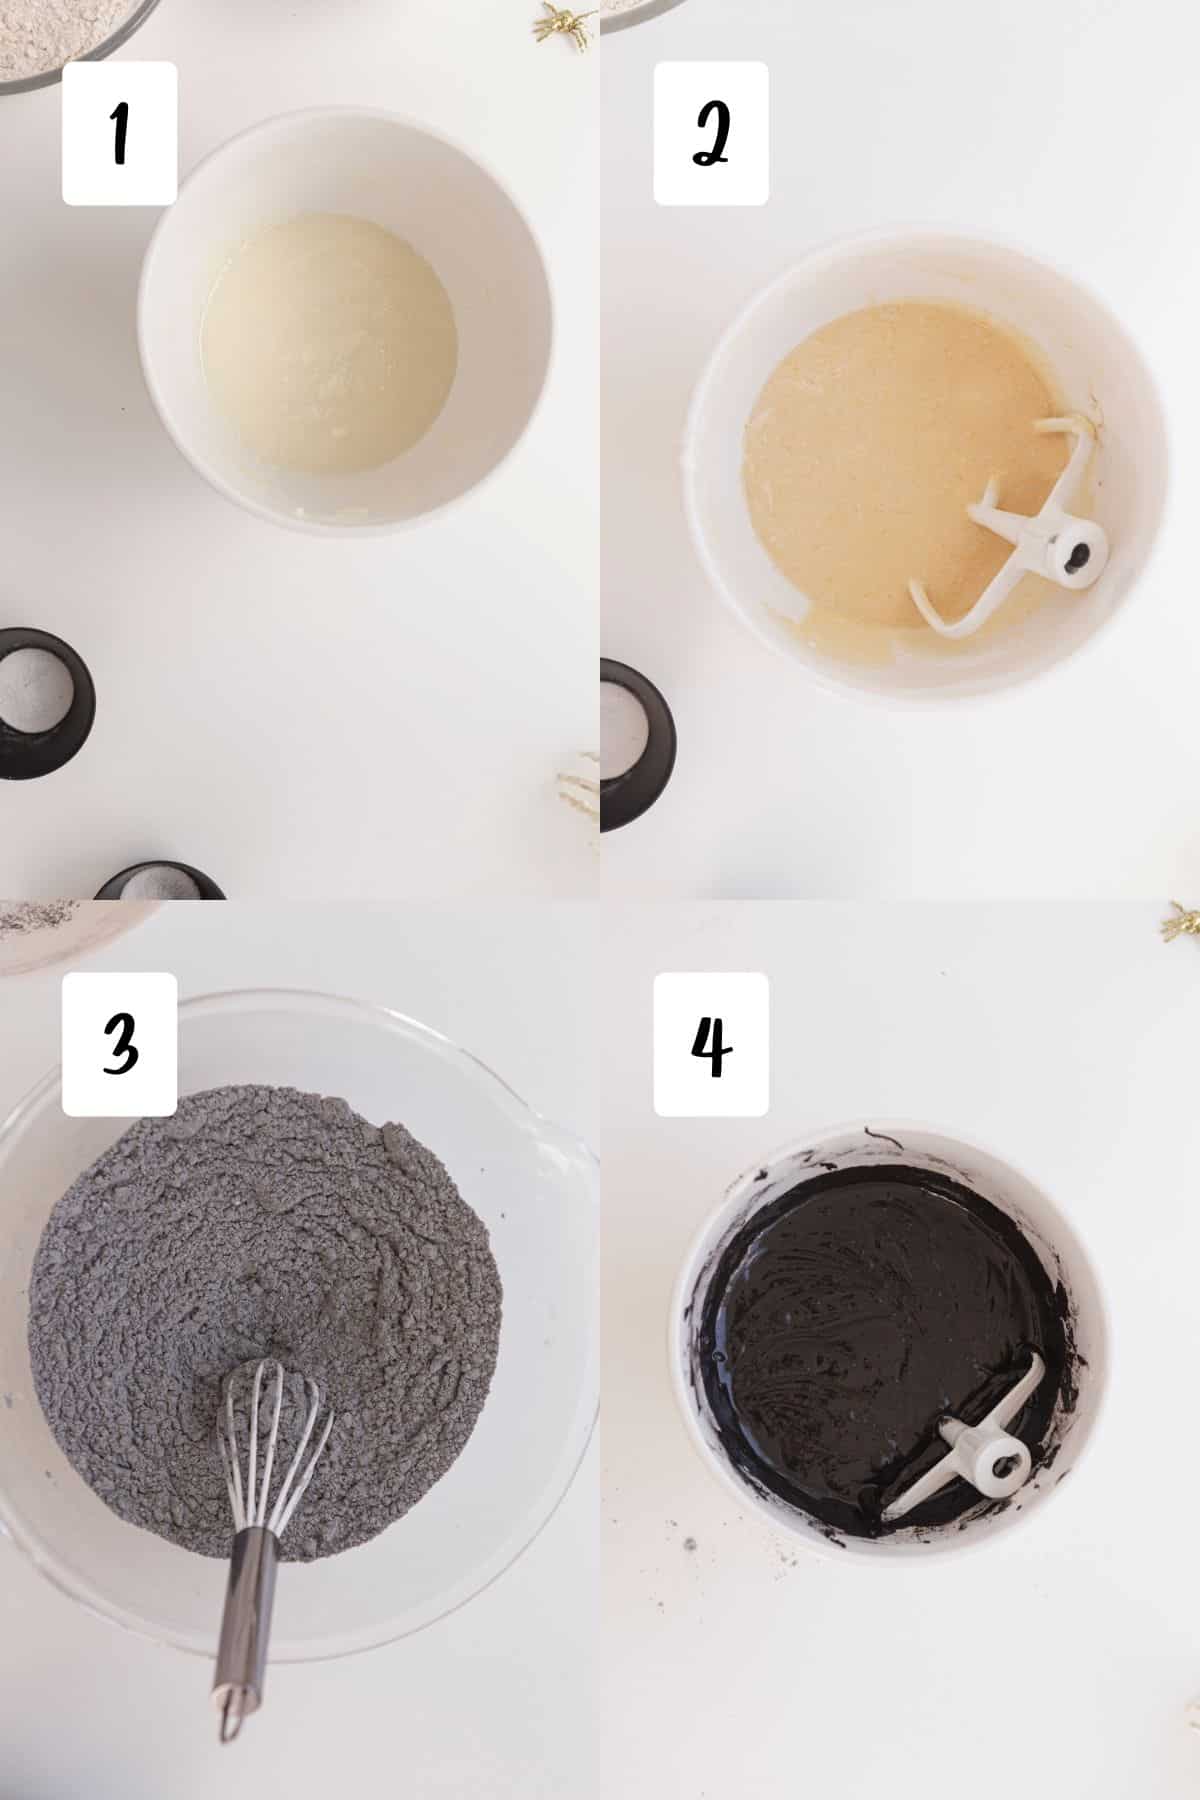
- You need to whip your butter and sugar together until light and fluffy. Add in the oil and mix until combined.
- Then add in one egg at a time until incorporated. Add in vanilla and mix until incorporated.
- In a separate bowl, mix together all of your dry ingredients. Whisk or stir it until combined.
- Then go back and forth mixing in the dry ingredients and milk mixture until completely combined. Pour into 3 separate cake pans and bake.
Making the Frosting
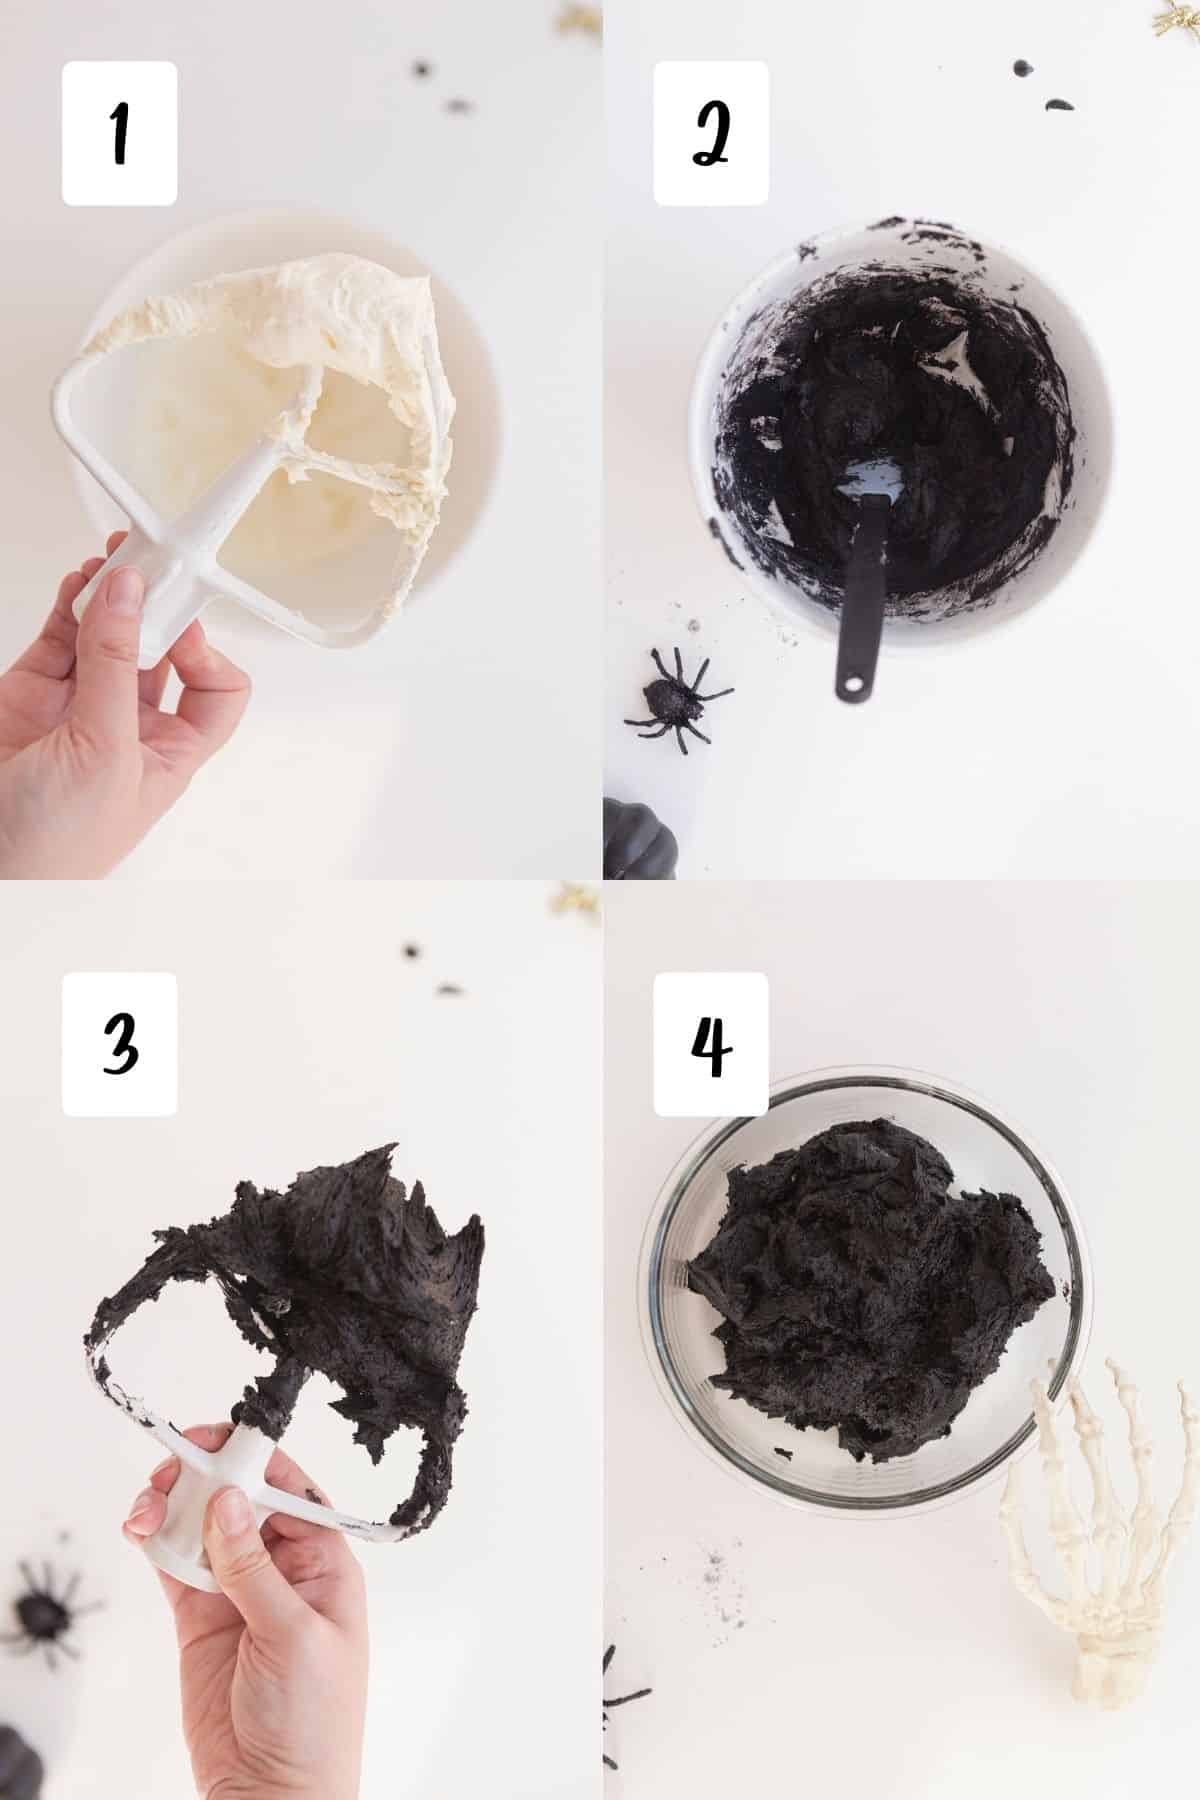
- Whip the butter with a paddle attachment for about 2 minutes. Then add in cream cheese and continue to whip for an additional 6 minutes on a medium speed.
- Next add in the powdered sugar and cocoa powder slowly to keep it from flying everywhere or clumping.
- Once incorporated whip for another 2-3 minutes to make it light and fluffy.
- Use immediately or put in in an air-tight container and store in the refrigerator. Remove for about 30 minutes to let it thaw a bit.
Assembling the Cake
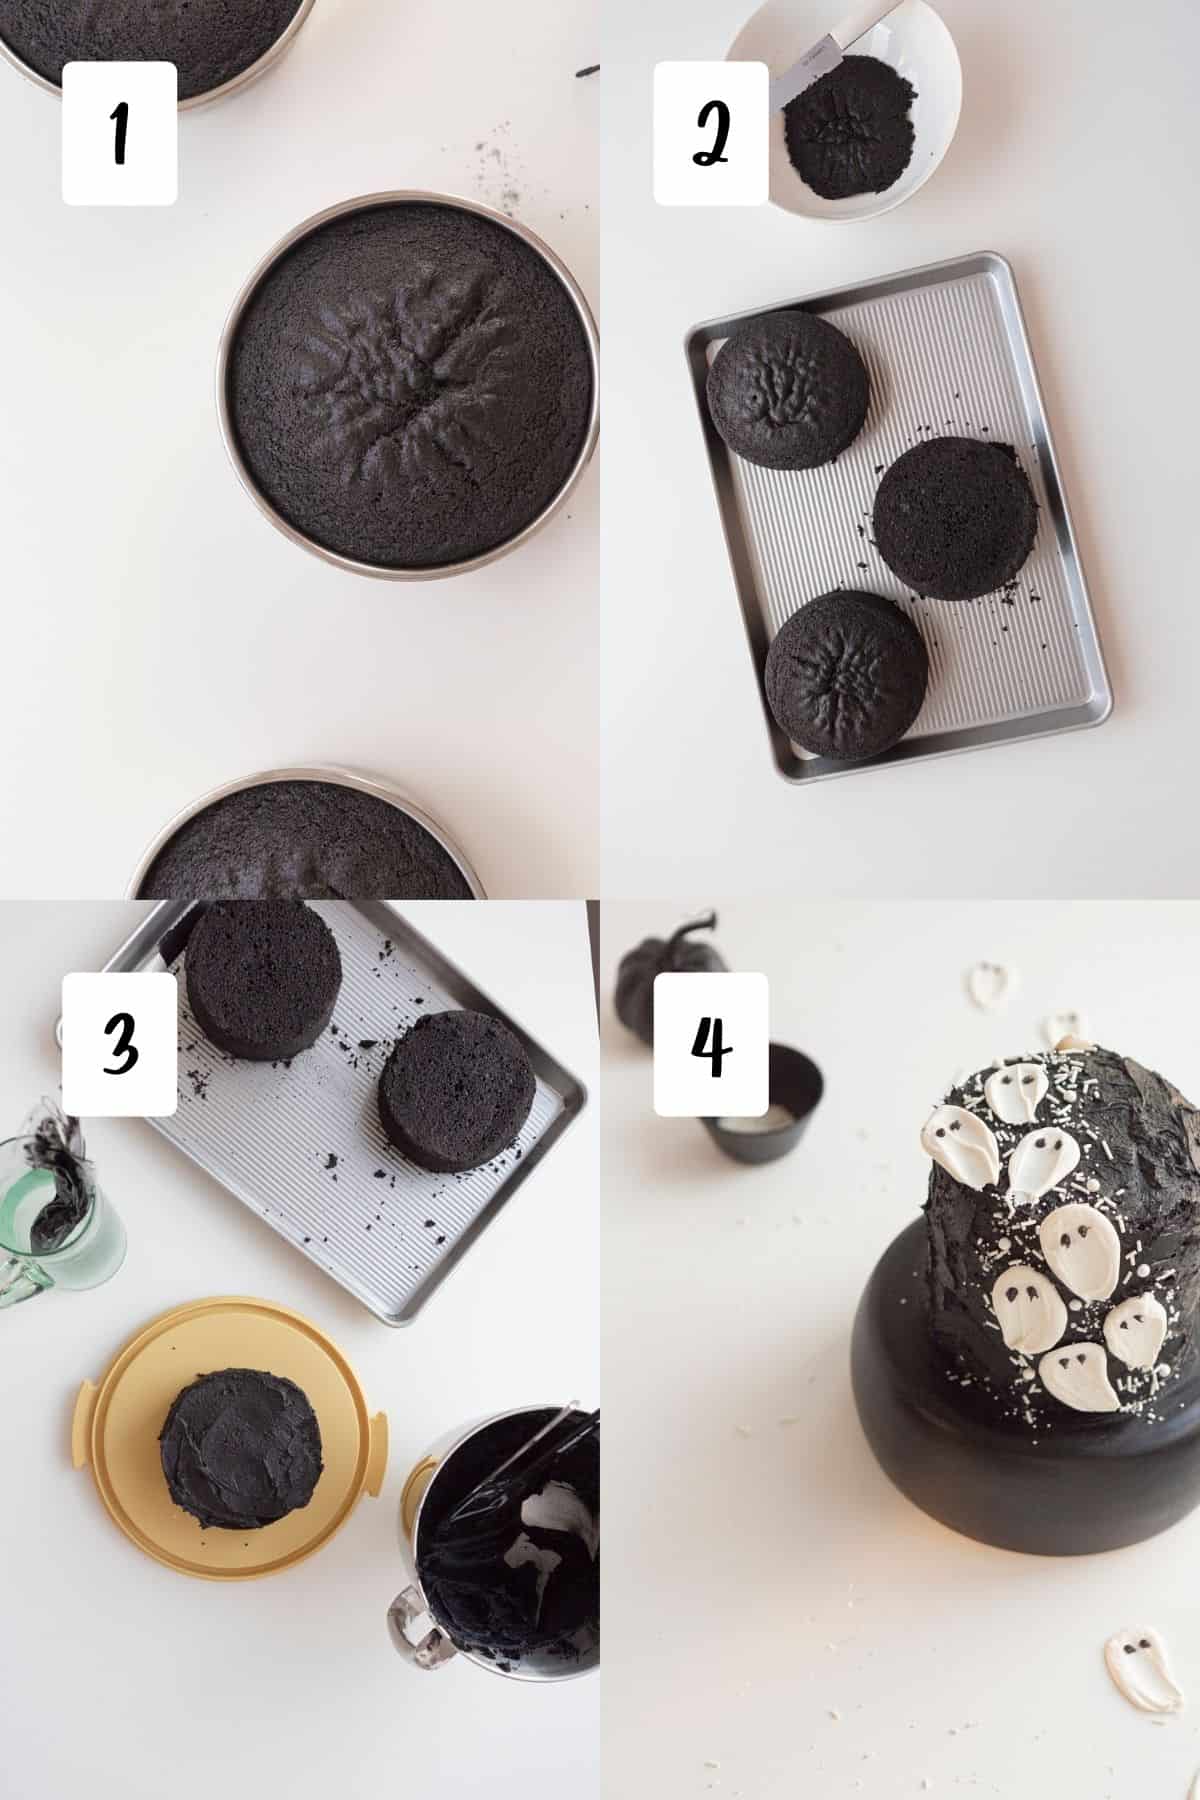
- Allow cakes to cool fully. You don’t want to work with warm cakes. You can remove from the pans after about 10 minutes and this can help. You can also place in the freezer or fridge to cool them quicker.
- Slice off the domed tops of the cakes. You can save or eat the scraps.
- Take each cake layer and layer some frosting between each layer. Have the bottom layer sliced side up. Then the next two cake layers slice side down. This helps with the shaping.
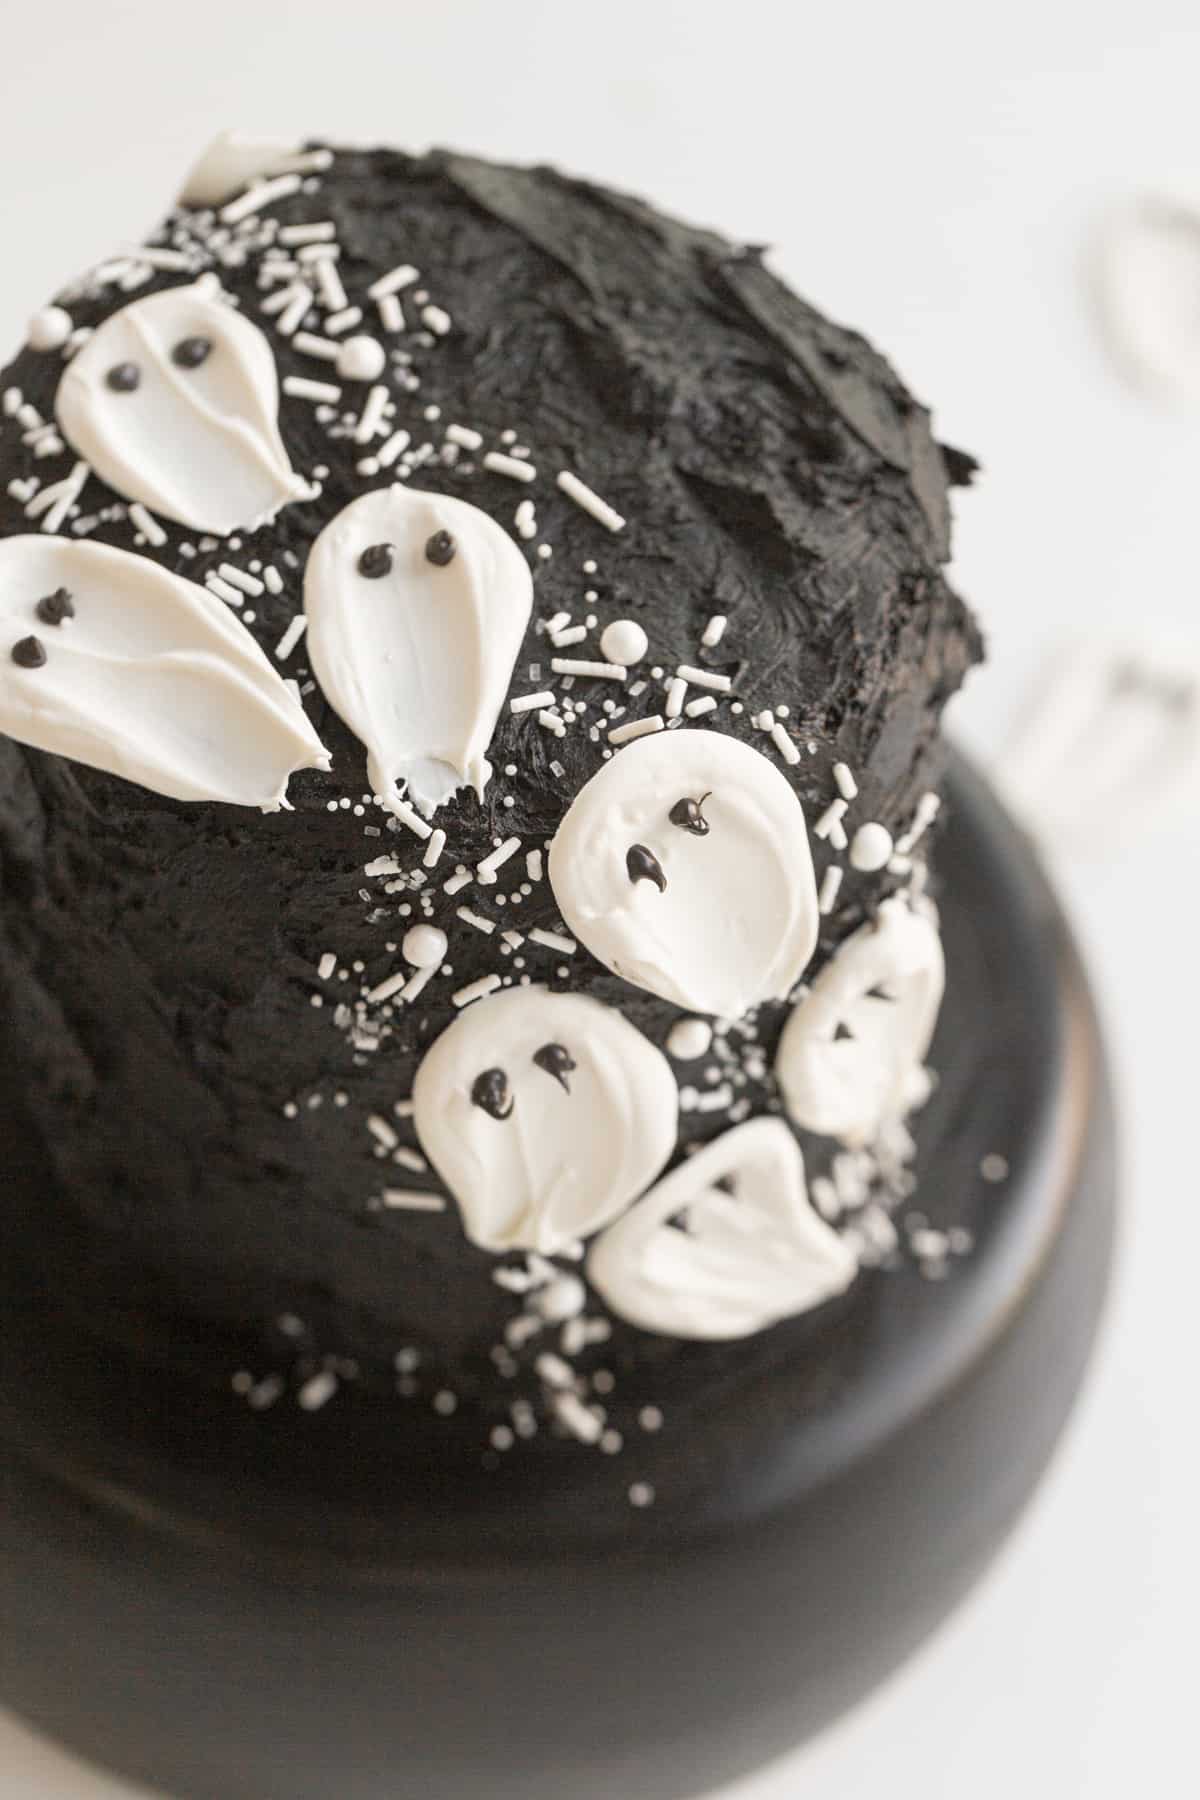
- Coat the whole cake in frosting. Then decorate by adding little ghosts and sprinkles and serve.
Room Temperature Ingredients
Why do I need to bake with room temperature butter?
So many baking recipes call for room temperature butter. This is due to a few things. 1) An emulsion is formed when all the wet ingredients are at room temperature and mixing. You are whipping in the air into the batter. Which will later help in baking when you get that light and fluffy texture. 2) Room temp butter is also able to blend smoother and create a cohesive batter. If you don’t have it room temp it can become very dense.
How to get butter room temperature for baking
I usually leave mine on a plate on the counter for a couple of hours. Or maybe on the oven if it’s being used for something else. If you are in a hurry you can zap in the microwave in very short increments. Just don’t melt it.
Why do I need to Bake with Room Temperature Eggs?
A lot of baking recipes (mine included) ask for room-temperature eggs. This is because a room temp egg is easier to break down than a cold egg. So, therefore, it mixes into the batter better. ALSO, room temp eggs get a better volume making for a fluffier baked good.
How to get eggs room temperature
I would suggest leaving them on the counter for 1-2 hours to get room temp. However, if you forget or run out of time, another option is to place the eggs into a bowl of warm water (not hot) for about 10-15 minutes.
FAQs
Black velvet cake is a fun version of red velvet cake that’s perfect for Halloween or a themed party. Any color velvet cake is essentially chocolate cake with an acidic tang to it added by buttermilk or vinegar.
Velvet cake recipes have an acidity to it with vinegar or buttermilk. This helps to add more flavor to it, but it very similar to a chocolate cake. Most of the time a velvet cake has a cream cheese frosting instead of something like a buttercream frosting.
Red velvet is essentially chocolate cake, with a bit of vinegar or buttermilk. There is an acidic aspect to it. So, it will turn out brown without food coloring or black cocoa powder. You can make it any darker color like red, purple, blue, or black velvet.
Whisking the butter and sugar together for a few minutes helps for there to be air added into the batter, but also helps to emulsify the sugars and make them less hard within the batter. You want to whip butter and sugar together for all baking recipes like cakes, cookies, etc. to help with this. You will know it’s ready when you see it has turned to a very light color, grown largely in mass.
Other Recipes to Try
- Black Velvet Cupcakes
- Halloween Rice Krispie Treats
- Carrot Cake with Graham Cracker Crumble
- Pumpkin Cake with Gingersnap Crumble
Love this Recipe?
Did you make this recipe and just love it? Awesome! If you have a quick minute and could leave a star rating and comment below, I would appreciate the support and knowing your feedback! And if you’re over on Instagram, be sure to tag me in your photos!
Equipment
- Stand Mixer
Ingredients
Wet Ingredients
- ½ cup unsalted butter room temperature
- 1 ½ cup granulated sugar
- ½ cup grapeseed oil
- 4 eggs large, room temperature
- 1 tablespoon vanilla extract
Milk Mixture
- 1 ½ teaspoon white vinegar*
- 1 cup milk*
Dry Ingredients
- 2 ¼ cup all-purpose flour
- 6 tablespoons unsweetened cocoa powder
- 1 ½ teaspoon baking powder
- 1 ½ teaspoon baking soda
- 1 ½ teaspoon salt
Cheese Cream Frosting
- ½ cup unsalted butter room temperature
- 8 oz cream cheese room temperature
- 1 tablespoon vanilla
- 4 cups powdered sugar sifted
- 3 tablespoons cocoa powder sifted
Optional
- sprinkles
- candy ghosts**
Instructions
Cupcakes
- Preheat the oven to 350° F.
- Using your paddle attachment on your stand mixer, beat together the butter and sugar and mix on medium speed, about 4, for 4-5 minutes. You want it light in color and fluffy. Scrape sides of bowl as needed.
- Then add in oil, eggs, vanilla all separately and mix about 30 seconds to 1 minute each. Until each is incorporated.
- Add milk and vinegar in a small bowl and set to the side.
- In a separate large bowl, sift the flour, cocoa, baking powder, baking soda, and salt. Mix thoroughly.
- Turn your stand mixer back onto a low speed and slowly add ⅓ of the dry ingredients into the wet ingredients. Mix until combined. Add in ½ of the milk mixture until combined. Mix in another ⅓ of the remaining dry ingredients. Mix until thoroughly combined. Then add in the rest of the milk mixture and mix until combined. And then finally add in the last of the dry mix. Mix until combined, but don't over mix. Scrape sides of bowl as needed.
- Let the batter sit while you prepare the pans. This allows the batter to rise a bit more.
- Prepare three 6”cake pans with liners. Add the cake batter evenly among the three pans.
- Place the cakes into the oven. Bake for 45-55 minutes. Check with a toothpick until it comes out clean.
- Take cakes out and cool in the pan. Then remove from pans to cool on a cooling rack.
Cream Cheese Frosting
- Using your paddle attachment cream the butter by itself for 2 minutes. This helps to create a fluffy texture. Scrape sides of bowl as needed.
- Add in cream cheese and mix on medium for 6 minutes. Scrape sides of bowl as needed.
- Add in the vanilla and stir until well combined.
- Add in powdered sugar slowly. Mix until thoroughly combined and smooth. Then add in the cocoa powder. Allow to continue to mix for 2-3 minutes to let it fluff up. Scrape sides of bowl as needed.
Assembling
- Take a cake leveler or serrated knife and slice off the domed tops.
- Place one cake layer sliced side up on a cake stand or plate. Then scoop or pipe some frosting onto the top of that level. Smooth over with an offset spatula or butter knife.
- Next, take another cake layer on with the sliced side down. Again, scoop or pipe some frosting onto the top of that level. Smooth over with an offset spatula or butter knife.
- Then take the last layer and lay it on top with the sliced side down. Add on frosting and smooth over the entire cake. There is no need for a crumb coat on this cake as it’s all black and you won’t be able to see the crumbs. Coat the whole cake in frosting.
- Add little ghosts and sprinkles and serve.
Notes
- Black cocoa powder: You can find this online fairly easily. Too much of this and you might taste a little chemically. This can also mess up the color of your BM, so be forewarned. Also, be sure to not be wearing your favorite outfit/apron, use your metal bowl mixer if you have one, and use pure silicone items. This will help from staining.
- Black food dye: You can replace the black cocoa powder with regular cocoa powder for an all-brown cake or add some black food dye. This can also mess up the color of your BM, so be forewarned. Also, be sure to not be wearing your favorite outfit/apron, use your metal bowl mixer if you have one, and use pure silicone items. This will help from staining.
- Storing: If you don't eat your whole cake in one sitting, I recommend storing it in the fridge as the frosting is made with cream cheese. You can store them in the fridge for up to 5-7 days.
- Whipping Butter and Sugar: This step is necessary for getting a light and fluffy cupcake, don't skimp on it. It adds needed air to the batter so your cake isn't too dense.
- Whipping Butter and Cream Cheese: Again, this is to help with the texture. This makes for a light and fluffy and perfectly balanced frosting.
- Room Temperature: Whenever something says room temperature, it's so important to follow those instructions. If you don't use room temperature things might not mix together and incorporate properly.
Leave a Reply